


Adorable zombies only crave one thing- Rice Krispies Treats Brains! These easy treats are a deliciously creepy twist on a classic favorite!
Ghoulish festivities are a cackle of a good time with easy-to-make sweets like Rice Krispie Treats Brains! Toss marshmallows, a little butter, a drop of bat’s blood (food coloring), and Rice Krispies cereal together to shape into delectable little brains for a dessert feast that zombies will break down the door for!

Brain Food
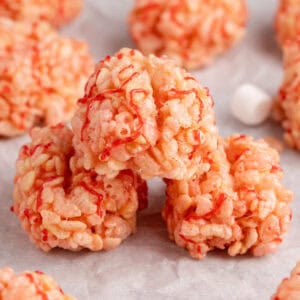
Halloween is big in this house, and creep-tastic treats are our jam! Eyeballs, witch’s brew, and graveyard dirt are everywhere, and we love to be in the thick of it, snacking and spooking. Since we like to have something for everyone, we can’t forget about all the cute and sometimes terrifying zombies that like to stop by for a spell, so we make a big plate of brain food for the horde. Rice Krispie Treats Brains are super easy to make, just like regular Rice Krispies Treats, but shaped into brains and decorated for a macabre twist. These hauntingly good treats will have people banging on your door, screaming, “brraaiiiinnnsss!”
Keep a close eye on all the fun with Eyeball Oreo Balls, but don’t forget to hang up your big pointy hat and enjoy the rocking wake with a cauldron of sweet Witch’s Brew!
Other Recipes to Serve with Rice Krispie Treats Brains
- Create the perfect Halloween dinner party with 25 Ghoulishly Good Halloween Dinner Ideas!
- Fall Harvest Chex Mix is the perfect snack for when you have lots of restless ghosts drifting through the house, looking for something munchy!
Ingredients

Mashmallows: To make these brains, you will need marshmallows. You can use regular or mini, whatever you have on hand or prefer to use.
Butter: Set out unsalted butter to make these treats.
Rice Krispies: Pick up your favorite brand of Rice Krispies cereal for this recipe.
Food Coloring/ Icing: You will need a little red gel food coloring to make the brains, along with red gel icing to decorate the brains.
How to Make Rice Krispies Treats Brains
STEP ONE: Line a baking sheet or two with parchment paper and set them aside for later. Melt the butter in a large pot over medium-low heat. Add the marshmallows and food coloring to the melted butter and stir until the marshmallows have melted.


STEP TWO: Take the pot off the heat and quickly stir in the Rice Krispies cereal until well mixed.

STEP THREE: Lightly spray or grease a 1/4 cup rounded measuring cup or scoop to prevent sticking, and scoop the Rice Krispies mixture onto the prepared baking sheet. Once all of the mixture has been scooped onto the baking sheet, shape the treats into an oval.

STEP FOUR: Lightly press the back of a greased butter knife into the center of the treats to create a line, and then decorate the brains with red gel icing squiggles. Allow the treats to set for at least two hours before devouring.

Tips for Success
- Since food coloring can vary, start with a little food coloring and add enough to get a classic pink brain color. Depending on your food coloring, this could be one drop or more.
- Be sure to spray your measuring cup or scoop after every few scoops to prevent the cereal mixture from sticking. Spray or grease your fingers as well if you’ll be using your hands to shape the treats.
- Store these brains in an airtight coffin or other container for up to four days. Be sure to use wax paper if you layer these treats to prevent them from sticking together.

What’s a fun fact about Rice Krispies?
Rice Krispies cereal was created in the late 1920s by the Kellogg company, but it was an Iowa State graduate student who really put Rice Krispies and specifically Rice Krispies Treats on the map! In the mid-1930s, Mildred Day and her associate concocted the Rice Krispies Treats recipe, and although they were slow to launch the product, once they did, it was an instant hit! The recipe has largely remained unchanged, and thanks to this recipe, we have so many sweet, fun treats that delight us to this day!

Why do Rice Krispies crackle?
As delightful and iconic as a witch’s cackle, the sounds that Rice Krispies cereal makes are so recognizable that it’s part of the cereal’s slogan: snap, crackle, and pop! Now, you won’t hear those haunting sounds when you open the package of cereal, but once you add milk and the air within the pieces of puffed cereal pushes to be released, you will hear a cracking sound when the air escapes. The sounds of all those little spirits being released can be quite noisy, and a fun mad scientist experiment to see how long it takes for all the snap, crackle, and pops to die down!

More Creep-tastic Treats to Love!
- Boo Bark
- Frankenstein Marshmallow Pops
- Spooky Peanut Butter Filled Chocolate Cupcakes
- Easy Monster Fudge
- Pumpkin Spice Brownie Pops
Rice Krispie Treats Brains
Ingredients
- 6 tablespoons salted butter (see note)
- 2 ½ cups marshmallows
- 1 drop red food coloring plus more as needed
- 4 ½ cups Rice Krispies
- 1 tube red gel icing for decorating
Instructions
- Line a large baking sheet with parchment paper. Set aside.
- In a large pot, melt the butter over medium-low heat. Once melted, add the marshmallows and food coloring and stir regularly until almost fully melted. The color should be a nice red, but it'll lighten once the cereal is mixed in.*Note: Having the odd white piece of marshmallows helps to give the brains some contrast. So don't worry if they're not 100% melted.
- Remove the pot from the heat and add the Rice Krispies. Mix quickly until evenly combined.
- Lightly grease a ¼ cup measuring cup (round bottom preferred) with non-stick cooking spray. Fill it with the rice krispie mixture and drop a level scoop onto the prepared baking sheet. Working quickly, repeat until all the cereal is used, respraying with non-grease spray as needed (about every 3 scoops).
- Shape the scoops into an oblong shape, keeping the bottom flat to resemble a brain. With the back of a butter knife, lightly press down the center to create two “brain hemispheres”.
- Design as desired with red gel icing, drawing squiggles over the brains. Allow them to fully set up for about 2 hours before serving.


Leave a Reply